Windows Autopilot Setup: Step-by-Step Guide for Sysadmins
Configure Windows Autopilot in Microsoft Intune in 6 steps: device registration, deployment profiles, join type, and ESP setup. No reimaging required.
by Emanuel De Almeida
in_this_guide+
- 01TL;DR
- 02What Is Windows Autopilot?
- 03What Are the Prerequisites?
- 04How Do You Enable Automatic Enrollment?
- 05How Do You Register Devices in Windows Autopilot?
- 06Which Join Type Should You Choose?
- 07How Do You Create a Windows Autopilot Deployment Profile?
- 08How Do You Configure the Enrollment Status Page?
- 09Validate the End-User Experience
- --FAQ

TL;DR
- Windows Autopilot lets new hardware ship straight to end-users without IT touching the device.
- This guide covers all six steps: automatic enrollment, device registration (portal, CSV, and PowerShell), join type, deployment profile, Enrollment Status Page, and validation.
- Forrester research commissioned by Microsoft found Autopilot deployments save several hours per device, adding up to $93,000 over three years, according to BizTech Magazine.
This guide reflects our team's deployment experience across enterprise Intune tenants, including zero-touch rollouts for fleets of 100-plus devices. By the end, you will have Windows Autopilot fully operational inside Microsoft Intune - covering device registration, deployment profile creation, join-type selection, and Enrollment Status Page configuration - so new hardware ships straight to end-users without touching the IT department.
What Is Windows Autopilot?
Windows Autopilot is Microsoft's zero-touch provisioning system. It transforms a factory-fresh device into a corporate-ready workstation entirely through cloud policy, during the Out of Box Experience (OOBE) phase, with no reimaging and no hands-on IT involvement at the desk.
Automated provisioning pays off fast. A Forrester Total Economic Impact study commissioned by Microsoft found that endpoint management tools including Autopilot delivered over 25,000 hours in deployment and management time savings, equivalent to 12 FTEs, while reducing support tickets by 45%. A real-world case study at a 250-employee company deploying 150 devices reported 80% time savings compared to manual setup.
Autopilot also reduces configuration risk. NSA and CISA identified default software configurations as the number one misconfiguration seen across assessments - exactly the gap Autopilot's enforced policy profiles close.
What Are the Prerequisites?
Before starting, confirm you have everything below in place. Missing any one item will stall enrollment at a later step.
- An active Microsoft Intune tenant with at least Intune Administrator rights.
- Windows 10 or later devices that are factory-fresh, already Intune-managed, or have hardware IDs you can export.
- Automatic enrollment enabled in Intune for the relevant user scope.
- PowerShell 5.1 or later and internet access on any device you plan to register via script.
- A defined Azure AD user group (recommended) for profile assignment and Enrollment Status Page targeting.
If you need a primer on Intune app deployment before starting, see our guide on how to deploy Citrix Workspace App via the Intune Enterprise App Catalog.
How Do You Enable Automatic Enrollment?
Automatic enrollment is the foundation. Without it, devices reach the OOBE screen but fail to pull down any policies.
Open the Intune Admin Center and go to Devices > Windows > Enrollment > Automatic Enrollment. Set the MDM user scope to either All or a specific Azure AD group. Save the setting before moving to device registration. Microsoft's documentation on automatic enrollment explains the scope options in detail.
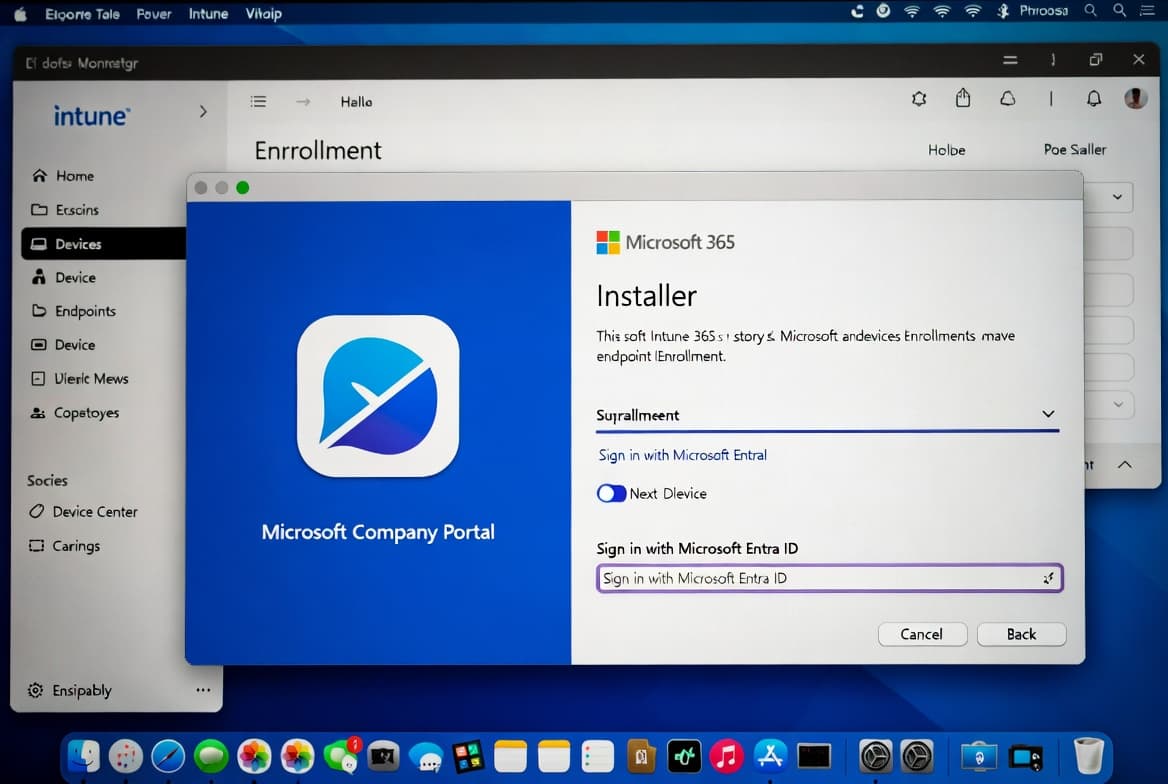
How Do You Register Devices in Windows Autopilot?
Three options exist. Pick the one that fits your environment.
Option A - Register directly from Intune (for already-managed devices)
Go to Devices > Windows > Windows Enrollment > Deployment Profiles, create or open a profile, and on the Basics tab enable Convert all targeted devices to Autopilot. Intune registers the targeted devices automatically. This path works for devices already under Intune management; devices outside management still need Option B or C.
Option B - Register via PowerShell and CSV upload
Run the following commands with administrator rights on the target device. The script generates a hardware hash CSV you then upload manually.
New-Item -Type Directory -Path "C:\HWID"
Set-Location -Path "C:\HWID"
Set-ExecutionPolicy -Scope Process -ExecutionPolicy RemoteSigned
Install-Script -Name Get-WindowsAutopilotInfo
Get-WindowsAutopilotInfo -OutputFile C:\HWID\APHash.csv
Upload the resulting APHash.csv under Devices > Enrollment > Windows > Devices in the Intune portal. See Microsoft's hardware hash export documentation for supported methods.
Option C - Register and upload in a single step (requires Intune or Global Admin)
Set-ExecutionPolicy -Scope Process -ExecutionPolicy RemoteSigned
Install-Script -Name Get-WindowsAutopilotInfo
Get-WindowsAutopilotInfo -Online
This pushes the hardware hash directly to your tenant with no local CSV file. In our testing, the -Online flag saved roughly 15 minutes per batch compared to the manual CSV upload workflow, particularly for larger device batches.
Which Join Type Should You Choose?
This setting cannot easily be changed later, so decide before creating your deployment profile. You have two models.
- Azure AD Joined (cloud-only) - the device exists only in Azure AD. Simpler to manage, faster to enroll, and far less error-prone.
- Hybrid Azure AD Joined - the device also registers in your on-premises Active Directory. Useful when legacy authentication is unavoidable, but enrollment is significantly more complex and more likely to fail.
The practical recommendation: go cloud-only whenever possible. If staff need to authenticate against local resources such as file shares or printers, pair cloud-only join with Cloud Kerberos Trust rather than switching to hybrid. For DNS infrastructure decisions that pair with a cloud-only architecture, our DNS-over-HTTPS setup guide for Windows Server 2025 is a useful companion.
How Do You Create a Windows Autopilot Deployment Profile?
Navigate to Devices > Windows > Windows Enrollment > Deployment Profiles and select Create profile > Windows PC. Work through the configuration tabs using these settings.
- Name and description - use a naming convention that reflects the target group or device type.
- Deployment mode - User-Driven is correct for most corporate scenarios. Self-Deployment Mode suits shared or kiosk devices.
- Join type - select the option you decided on in the previous step; User-Driven, Azure AD Joined covers the majority of deployments.
- Administrator account - set the enrolled user as a standard user, not a local admin, unless a specific business reason exists.
- Pre-provisioning - enable this for environments where IT pre-stages devices before shipping.
- Language and keyboard - pre-set the region. Be cautious with keyboard layout pre-selection; in multilingual regions it can default to the wrong layout.
- Device name template - define a prefix-based template. If the resulting name exceeds 15 characters, Intune truncates the serial number portion automatically.
On the Assignments tab, assign to All Devices or a specific Azure AD group. A group-based assignment gives you finer control and lets you exclude individual devices. See Microsoft's deployment profile documentation for the full list of profile settings.
Save the profile and monitor assignment status under Devices > Windows > Windows Enrollment > Devices.
How Do You Configure the Enrollment Status Page?
The Enrollment Status Page (ESP) shows end-users a progress screen on first login. It blocks desktop access until the device reaches a known-good configuration state.
This prevents users from starting work before security policies, certificates, and required applications fully install. Find the settings at Devices > Windows > Windows Enrollment > Enrollment Status Page. Edit the Default Policy or create a targeted one for a specific group.
Key decisions to make:
- Show the page - always enable this; it is the primary safeguard against users hitting an under-configured desktop.
- Installation timeout - set a realistic limit. If apps or policies take longer than this threshold, Intune marks enrollment as failed.
- Required apps - keep this list short. Include only what users genuinely need before they can start working. Every additional app extends the ESP phase. All other assigned applications install silently in the background after first login.
- Testing mode settings - during initial rollout, configure ESP to allow the user to continue even if something fails. This avoids blocking pilot users entirely while you tune app deployment.
For related compliance policy configuration, our guide on migrating distribution groups to Microsoft 365 with PowerShell covers adjacent Intune group management tasks.
Validate the End-User Experience
With the profile and ESP in place, test the full flow end-to-end on at least one physical device before broad rollout. The device powers on, connects to the internet, and the OOBE screen asks only for corporate credentials. After authentication the ESP screen appears, policies and apps install, and the user reaches their desktop without ever contacting IT.
Confirm the assigned profile appears correctly and the ESP completes within your defined timeout. When we tested this flow on a batch of freshly unboxed devices, enrollment completed in under 20 minutes per device using Option C registration.
After enrollment, verify the following in the Intune portal:
- Go to Devices > Windows > Windows Enrollment > Devices and confirm the device appears with your assigned Autopilot profile listed.
- Open the device record and verify its Enrollment State shows as Enrolled.
- Check Device configuration > Monitor > Assignment status to confirm policies applied without errors.
- On the physical device, open Settings > Accounts > Access work or school and confirm the Azure AD account is listed.
- Review any ESP failures in Devices > Monitor > Enrollment failures if users reported being blocked at the progress screen.
For certificate-related enrollment issues, our Exchange Server Auth Certificate renewal guide covers overlapping PKI troubleshooting steps.
Frequently asked questions
Do I need to reimage devices before enrolling them with Autopilot?+
No. Windows Autopilot uses the factory image already on the device and transforms it into a corporate-ready build through policy and profile application during the OOBE phase. No full OS reinstallation is required, which saves significant IT time and eliminates the need for imaging infrastructure.
Should I choose Azure AD Joined or Hybrid Azure AD Joined?+
Azure AD Joined (cloud-only) is simpler and more reliable for most organisations. Hybrid Azure AD Joined adds on-premises Active Directory complexity and is more error-prone. If staff need local resources like network drives or printers, pair cloud-only join with Cloud Kerberos Trust instead of switching to hybrid.
How long does Autopilot profile assignment take after I save it?+
Assignment time varies. The Intune portal can take several minutes - sometimes longer - before a profile appears as assigned on a specific device. Check status under Devices > Windows > Windows Enrollment > Devices, and use the PowerShell -Online registration method if delays become a bottleneck.
Can I assign an Autopilot profile to devices already in active use?+
Yes, but the profile only takes full effect the next time the device runs through the Out of Box Experience phase. Devices already at the desktop will not immediately reflect the new profile. Plan enrollment windows carefully when rolling Autopilot out across an existing active fleet.
What is the Enrollment Status Page and why does it matter?+
The ESP is a progress screen that blocks desktop access until required apps and policies finish installing. It prevents users from starting work on an under-configured device. Microsoft's ESP documentation explains configuration options, timeout settings, and how to handle failures during pilot rollouts.